This is the first in a series of posts concerning set-in sleeves. In this first post, I want to take a deep dive into the construction of a set-in sleeve and the essential measurements you need to understand fit. In the next posts, I will discuss how to modify the set-in sleeve to fit your own body, then take a look at the sleeve cap.
What is a set-in sleeve?
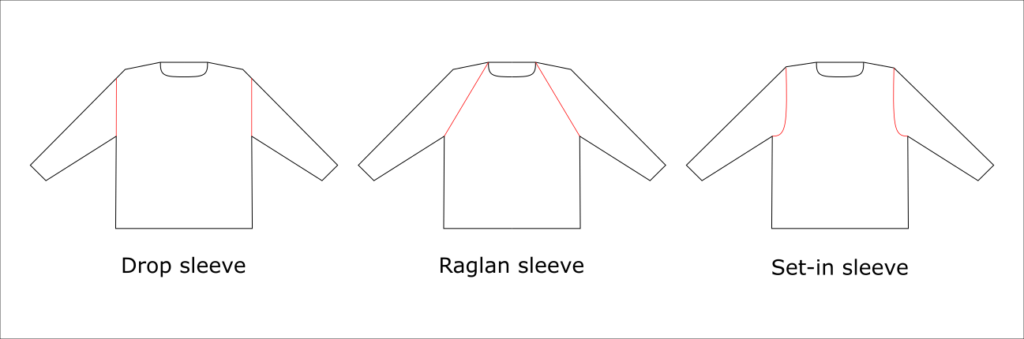
There are several different options for joining sleeves to the body in a garment. Each option gives a different look to the finished clothing. As a rule of thumb, drop shoulders give a boxy, slouchy look, a raglan gives a more sporty look and a set-in sleeve gives the most tailored look. A set-in sleeve has a seam that runs from the point of the shoulder, directly down and around the armhole. The shape created is known as the armscye and determines the angle at which the sleeve attaches. The top of the sleeve – the sleeve cap – is shaped with a corresponding curve in order to fit into the armscye neatly.
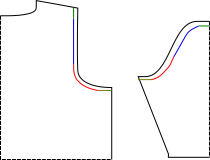
The diagram above shows the different components of a set-in sleeve, and how the armscye corresponds to the sleeve cap. The green line indicates the distance over the top of the shoulder. This is horizontal at the top of the sleeve cap to cover the width of the shoulder, but vertical for the armscye, as the fabric will mould to the body shape and curve itself. The blue line indicates the vertical portion of the armscye, and the corresponding diagonal on the sleeve cap. The red line indicates the curve from horizontal to vertical in the armscye, which matches an identical curve in the sleeve cap. Finally, the gold colour indicates the horizontal portion of the armscye; the underarm. This corresponds with a similar horizontal portion on the sleeve cap.
Essential measurements for a set-in sleeve
In order to make a set-in sleeve fit, you need to know several measurements.

Armhole depth
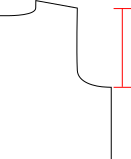
Armhole depth is the distance from the point of the shoulder to the bottom of the armhole.
To measure this: place a knitting needle (as we all have those, this is a knitting blog after all) under your arm, snug in your armpit. Making sure the needle is horizontal to the ground, measure from the needle up and over the shoulder and back down to the needle. Half of this distance is the armhole depth.

Length of the shoulder
The length of the shoulder is the distance from the centre back to the point of the shoulder. A set-in sleeve should sit right on the point of the shoulder.
The upper chest measurement is twice this distance (shoulder point to shoulder point).
To measure this: measure from the bump at the base of the neck (your spine) out to point where you would like the seam to sit on your shoulder.
Underarm distance
The amount the armhole should be decreased. There are two ways to calculate this (and bodies being bodies, these may not agree).
Option 1:
You can measure the armscye circumference. To calculate the underarm distance you need to take away twice the armhole depth (front and back armhole) from this measurement. You then need to divide this number by two as you need to create an armhole for both the front and back of the garment.
To measure the armscye circumference: measure from the point of shoulder, around under the armpit (snuggly) and back up to the point of shoulder.
Underarm = (armscye circumference – 2x armhole depth)/2
Option 2:
Alternatively, you can work out how much wider the chest measurement is from the upper chest measurement. Again, as front and back is calculated separately, the chest measurement should be divided by two before taking away the upper chest measurement.
To measure the chest: ensuring the tape is horizontal to the ground measure around the chest at the widest part.
underarm = (chest/2) – upper chest
Common assumptions in knitting patterns
When grading a knitting pattern, the grader will use a chart of standard sizes in order to calculate the number of stitches and rows needed for each size. It is usual practice to assume that the front and back of the garment are identical in terms of width. This means that the armscye is identically shaped front and back. In other words, it is symmetrical, as shown in the diagram below.

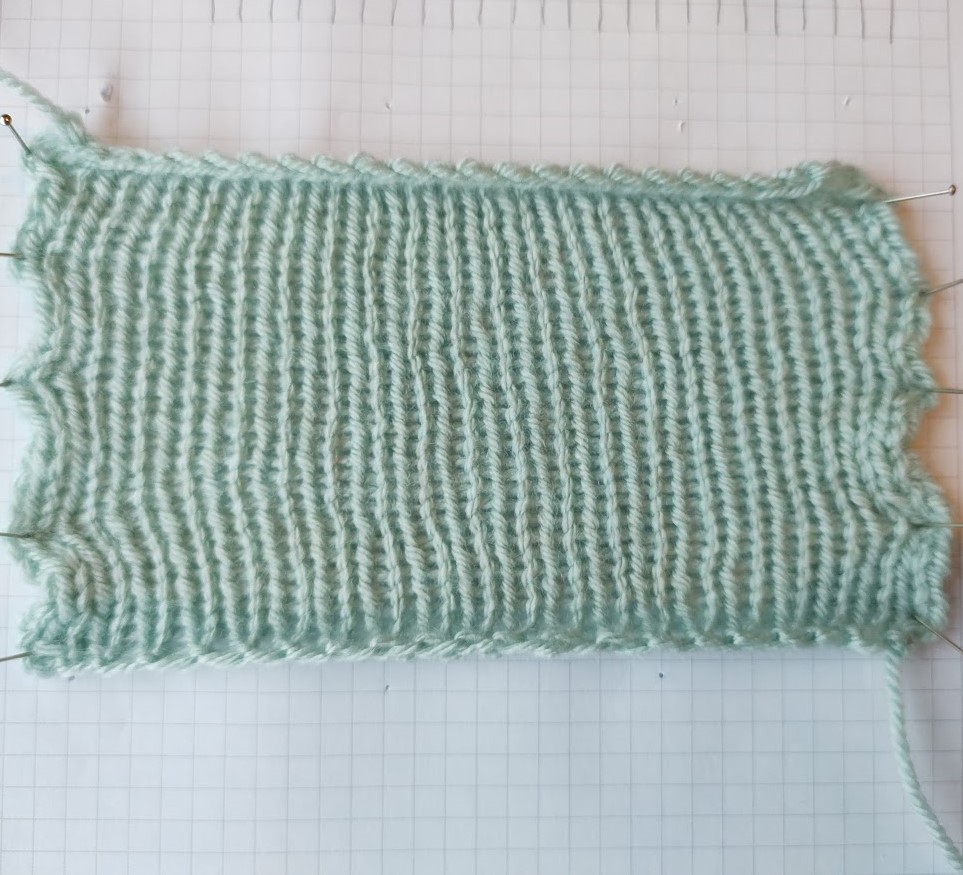
Luckily for makers, knitted fabric is amazingly forgiving. It stretches and accommodates to the body to an incredible degree. So, for many body types, assuming that the front and back are the same with the same number of stitches works well. Indeed, as long as there is around 2 inches or less difference between front and back the sweater will fit. A problem arises when the distance across the bust is much larger than the cross back measurement. In this situation the same number of stitches have to cover much bigger distance at the front compared to the back. Now, you can stretch knitted fabric, but inevitably the fabric cannot get bigger. If you stretch horizontally you lose distance vertically, as the photos of the same swatch shows below:

Modifying a pattern for a full bust
One solution, often suggested, is to add short rows across the chest at the front. This adds more length and so sorts out the hemline, but doesn’t really address the fundamental problem of the stretching. Additionally, for the pattern I wanted to modify, this would be a nightmare scenario. The short rows would need to be placed within an area of textured knitting and would play havoc with the stitch pattern. Quite frankly, I didn’t want to go there. Another option is to consider how a larger bust can be accommodated with fabric that doesn’t stretch. This is something that occurs all the time is dressmaking, so how is a full bust adjustment done?A full bust adjustment on a dressmaking pattern for a set-in sleeve
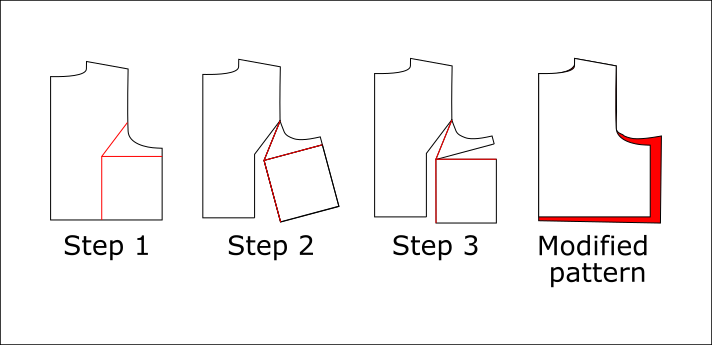
The first step (shown above) is to locate the bust point on the pattern piece. Once found, you draw three lines from here. One runs vertically down to the waist/hemline. One runs horizontally across to the side seam. The final one runs diagonally, meeting the armhole approximately 1/3 of the way up.
For Step 2, you cut both the vertical and diagonal line, leaving a pivot point where the diagonal line meets the armhole. The pattern piece is rotated outwards to add more fabric in the centre.
The rotation causes the side seam and waistline/ hem to become misaligned, step 3 fixes this. You cut along the original horizontal line, leaving a pivot point at the bust point. The fabric is rotated down until the side seam is once again vertical, and the correct amount of fabric has been added in the centre. This procedure adds length, and so the waist / hemline needs to be lowered.
The final diagram above shows the resulting shape these adjustments give. The new pattern piece is in red, behind the original pattern. These changes can be mimicked in knitting by adding length if it is needed, and adding additional stitches in the armscye to create more width at the bust.
In the next blog post, I plan to provide a walkthrough of these adjustments, stitch by stitch and row by row. In the meantime, Amy Herzog has a really clear discussion of these fit issues, as she discusses how she modifies garments for a better fit.
Wait there’s more!
You may also be interested in these related posts:
- modifying a set-in sleeve armscye
- modifying sleeve cap (coming soon)