This is the second in a series of posts discussing how to make modifications in fit to the set-in sleeve armscye of a sweater pattern. The main focus is how to do a full bust adjustment, though the same principles apply if you wanted to make the bust smaller too. In this post I run through all the modifications I made to an upcoming pattern in order for it to fit my body shape better. Throughout this post, I will be assuming that you know the basic measurements needed for a set-in sleeve, and how the pattern will be modified. If not, take a look at the first part of this series, which takes a deep dive into the construction of a set-in sleeve. All up to speed? OK, let’s get going.
Choosing a size
Once you have a pattern, before any modifications, you need to decide which size you will take as the baseline. Despite the number of sizes offered in the pattern, it is extremely unlikely that any one of them will fit your body perfectly. Sweaters are often chosen based on chest size, but this may not be the best option. For a set-in sleeve sweater, the shoulders need to fit. This construction gives a really tailored look, so if the shoulders are out, the whole sweater will look wrong. It is easier to adjust the chest circumference than it is to change the shoulders. I would recommend choosing a size based on the cross back length (upper body measurement), which will give the greatest chance for the garment to fit well.

The pattern comes with a schematic which lists all the measurements I used when grading the sweater. The Craft Yarn Council have a handy explanation for how these measurements apply to the body. You should remember that the measurements on the schematic are the finished measurements of the sweater, not the body measurements. This sweater has a classic fit and has 5cm (2 inches) of positive ease added. The schematic on the left only includes the measurements that will be needed for this blog post.
Deciding on my size
To help with the following example, it might be helpful to know a bit about my body type. I am tall (5’9), but most of this height is in my legs, my back is quite short. My arms are always too long for shop bought clothes. Below, I have placed my measurements (with ease added) in a table, alongside the closest sizes for the sweater. You can see that my upper body is more or less a size M, but my hips are size L. I want the henley to fit my shoulders, so I am going to choose to make size M. I can add more stitches after the waist to accommodate my hips.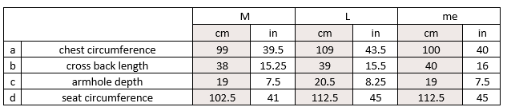
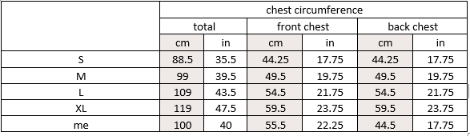
The standard size charts are based on a B cup. I am not a B cup. I cannot remember a time when I was a B cup. So, let’s add two more measurements into the mix. The pattern assumes equal distribution of stitches between the front and back of the sweater. As long as there is 2 inches or less difference between the front and back measurements, this will work. After measuring my bust circumference, I then placed a pin on each side seam and measured from pin to pin across my chest and then across my back. These measurements are in the table below. As you can see, there is more than 2 inches of difference between my front and back. My cross back measurement matches the S size, whereas across my front is halfway between L and XL. Modifications are certainly going to have to be made.
The plan
To sum up so far. I am planning to use size M as the baseline size. I will:- keep the shoulders as in the pattern
- add additional stitches to the front chest to accommodate a larger bust
- take these stitches back out for the waist shaping
- add additional stitches to accommodate my hips
Working with the pattern
You can get a lot of important information from the pattern. Knowing stitch counts and number of rows worked will be really useful when it comes to modifying. Tension (gauge) is also very useful. This pattern is written for DK yarn, and is at a tension of 22 stitches and 30 rows to 10cm/ 4 inches. It is worked from the top down. The following discussion starts with the shoulders and works down the armhole.Adapting the pattern for my body measurements
I am going to follow the pattern for the number of stitches to cast on and the short row shaping for the shoulders. I decided to also follow the pattern for the back armholes. Even though this will create a back wider than my own, this is a fit I am used to from shop bought clothes. The aim here is to create a better, not necessarily perfect, fit. So I will work the back the same as the pattern. This will give me an armhole depth of 19cm/ 7.5 inches and a cross back width of 38cm / 15.25 inches increasing to 49.5cm / 19.75 inches after the armhole. My own measurements are 19cm/ 7.5 inches for the armhole (perfect match!), 40cm / 16 inches for the cross back (close enough) and 44.5cm / 17.75 inches after the armhole (I can make that work). I am going to change the front armhole. I will keep the depth the same, but will add another ten stitches across the front – five to each side. This will change the front chest measurement from 49.5cm /19.75 inches to 54cm /21.5 inches. It’s true that this is slightly short of my target of 55.5cm /22.25 inches, but the knitted fabric will stretch and I have some additional leeway from the larger back too. These changes will give an overall circumference of 103.5cm /41.5 inches. Not too far from the target of 100cm / 40 inches, but it is larger. Yet another reason not to add more to the front, unless I also take some stitches away from the back.Creating a set-in sleeve armscye
In order to create the set-in sleeve armscye for the body, there are three parts to the armscye that need to be in proportion to each other: the vertical portion, the curve and the horizontal. If you are unsure about these terms, I talk about them in the first post of this series.
The total amount of increase from the cross shoulder distance to the chest should be halved, as this is distributed across the left and right armscye. Approximately half the total increase distance should be horizontal, and half should be part of the curve. The vertical portion of the curve should also be the same distance.
Using information from the pattern, we can work through the shape of the armhole for the Medium size.
We know the chest circumference is 99cm. We are working with the front and back individually, so we need half this measurement: 49.5 cm.
The cross back measurement is 38cm.
This means that the total difference from chest to shoulder is 49.5-38 = 11.5cm. To make life easier, I’m going to call this 12cm.

This is the total distance that we need to increase, but this is spread across a left and right armhole, so each armscye will increase by 6cm.
Finally, we know the horizontal part will be 3cm long, and the curve will fit in a square 3cm by 3cm.
The target armhole depth is 19cm, so the vertical part will be 19-3 = 16cm.
Writing it up into a pattern
The next step is to turn these measurements into rows and stitches. We can do this using the given tension in the pattern. The golden number is 3cm. That works out to 3/(10/22) = 6.6 stitches, and 3/(10/30) = 9 rows. I’m going to tweak this slightly, to give numbers that I can work with. Overall, the set-in sleeve armscye will increase by 13 sts, and the shaped section will curve over 10 rows, to maintain RS/WS continuity. The vertical part of the armscye will be 16/(10/30)= 48 rows long. We can check this against the pattern, remember the henley is worked from the top down, so the vertical part of the armhole is worked first:1. Work in st-st for 48 rows. Work will measure 16cm from point of shoulder.
2. Inc 1 st every RS row at each armhole edge 4 times, ending with WS row.
3. Cast on 4 sts at beginning of next two rows. 100 sts
4. Join front and back:
Rnd 1: Cast on 5 sts, k100 sts across front, cast on 5 sts, PM for side seam, cast on 5 sts, k100 sts across back, cast on 5 sts. Place BOR marker. 226 sts
1. This is the vertical section.
2. This is main part of the curve. It is worked over 8 rows, and increases 4 stitches at each armhole.
9 sts remain to be increased on each side.
3. Here I begin to transition from the curve to the horizontal. 2 rows worked (giving a total of 10 rows for the shaped section) and another 4 sts increased on each side.
4. The horizontal portion is worked when the front and back of the garment are joined. 13 sts increased overall.
Modifying a set-in sleeve armscye
From the early discussion above, we know that we want to add 5 stitches to each set-in sleeve armscye. But where and how should they be added?

Working through the numbers
Crunching the adjusted numbers gives: The new front chest width is 54cm. The cross back measurement is 38cm. This means that the total difference from chest to shoulder is 54-38 = 16cm. This is the total distance that we need to increase, but this is spread across a left and right armhole, so each armscye will increase by 8cm. Finally, we know the horizontal part will be 4cm long, and the curve will fit in a square 4cm by 4cm. The target armhole depth is 19cm, so the vertical part will be 19-4 = 15cm. 4cm is approximately 9 sts and 12 rows. Overall the armscye will increase by 18 sts. I’m going to ignore the slight uplift to the horizontal part of the set-in sleeve armscye created in the rotation during the full bust adjustment – let’s assume everything is still perfectly horizontal. Knitted fabric stretches, so this assumption shouldn’t break anything. We are aiming to keep the front and back as similar as possible. I am already shaping the armhole over 10 rows, so I think I’ll keep this the same. Therefore, I will add the additional 5 sts (13+5= 18sts) to the horizontal part during the joining of the front and back, and from the transition out of the curve.Writing up the modifications into a pattern
The new pattern (for the front armholes) will be:1. Work in st-st for 48 rows. Work will measure 16cm from point of shoulder.
2. Inc 1 st every RS row at each armhole edge 4 times, ending with WS row.
3. Cast on 7 sts at beginning of next two rows. 114 sts
4. Join front and back:
Rnd 1: Cast on 7 sts, k across front, cast on 7 sts, PM for side seam, cast on 5 sts, k100 sts across back, cast on 5 sts. Place BOR marker.
Almost there. Just one final tweak. If you look at the final round, where the front and back body are joined, you can see that I cast on a total of 12 sts across the bottom of the armscye. I am going to divide the 12 sts evenly across the front and back. So the joining round will read:
4. Join front and back:
Rnd 1: Cast on 6 sts, k across front, cast on 6 sts, PM for side seam, cast on 6 sts, k100 sts across back, cast on 6 sts. Place BOR marker. 118 sts for front, 112 sts for back.
The beauty of a top-down construction is that you can try it on as you go. I have many rows of plain stocking stitch from this point down to the waist. If I need extra length at the front, this would be an ideal place to hide some short rows. At the time of writing, I have not yet knitted this far. When I do, I will try the henley on, and see if I need to add length to level everything off ready for the waist.
Waist shaping
The additional stitches added at the chest could be left in. This can help the drape of a sweater. However, this particular pattern is a long line henley, and I would prefer to have some waist shaping to help with the silhouette. I prefer to have a more tailored look for my clothes.
The pattern already has some shaping below the waist. This shaping is placed on the princess lines, rather than at the side seams. I find that this gives more flexibility to the designer in crafting the shaping.
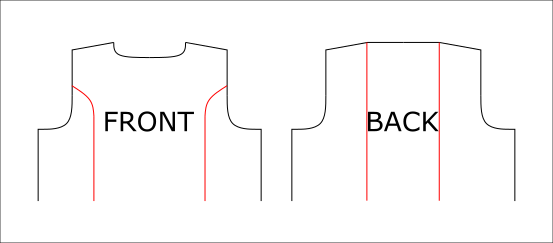
The princess lines are located a quarter of the way in from each side on the front, and a third of the way in from the sides on the back.
The plan
My target here is to decrease back to the number of stitches for size M before the waist, then to increase between waist and high hip to the number of stitches for size L. This matches my body shape; M for the upper body and L for the lower body. At the moment, after the full bust adjustment, I have 118 sts for the front and 112 sts for the back. I want to decrease down to 110sts for both. After the waist, I will increase to 124 sts for both the front and back.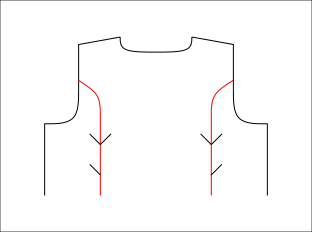
Princess line shaping
The advantage of using the princess line for shaping is that you gain much more control over the shaping. The front and back shaping are completely independent of each other. You can increase/ decrease by either 2 or 4 stitches on one row. This is achieved by either doing mirrored shaping on each side of the line, or only shaping outside of the line, as shown to the left. You can leave a variable number of unworked rows between the shaping rows, again adding to the flexibility of the shaping.Calculating the shaping for me
The first task is to work out where to place the shaping on the round.
The front
I have 118 sts for the front. To find the quarter lines, I need to divide this by 4: 118/4 =29.5. I will assume quarters of 29, 30, 30, 29 sts. So, I need to work 29 sts, shaping, 60 sts across the centre front, shaping, then 29 sts to the side seam.
I have 118 sts, and I want to decrease to 110st, so I need to decrease 8 sts. This can be done with 2 shaping rounds, decreasing 4 sts each. I don’t want to have too rapid a decrease, so I will work 3 non-shaping rounds between the 2 shaping rounds. This will take 5 rows.
After the waist, I want to increase from 110 to 124 sts, an increase of 14 sts. I can do this by working 3 shaping rounds, increasing 4 sts each (12 sts), then one additional shaping round, increasing by 2 sts only (14 sts). Again, if I work the shaping round on every 4th round, this shaping will take 13 rounds.
The back
For the back, I have 112 sts. I need to divide this by 3 to find the third lines: 112/3 = 37.33. I will assume thirds of 37,38,37 sts. So, I need to work 37 sts, shaping, 38 sts, shaping, then 37 sts to the side seam.
I have 112 sts, and I want to decrease to 110 sts, so I need to decrease 2sts. I can do this with 1 shaping round, decreasing 2 sts.
After the waist, the increasing will be identical to the front.
Writing up the adjustments
In writing up the pattern, there are a couple of things to think about. Firstly, I need a central stitch that I can use to mirror the shaping around. I am going to assume that this will come from the central set of stitches, so 2 stitches will be removed from the 60 stitches on the front, and the 38 stitches on the back when necessary. I also need to remember to allow 2 stitches for each decrease. Finally, I don’t want to decrease into the waist, then immediately increase again, so I am going to work an additional 3 non-shaping rows after the final decrease row going into the waist. This means the shaping before the waist will be worked over 8 rows, or just over 2.5cm / 1 inch. The adjusted pattern will read:
1. Repeat rnd until work measures 2.5cm / 1 inch less than length needed to reach natural waistline.
2. Rnd 1: p1, k26, ssk, k1, k2tog, k54, ssk, k1, k2tog, k26, p1, SM, p1, k to marker, p1. 114 sts front, 112 sts back
Rnds 2-4: P1, k to 1 st before marker, p1, SM p1, k to 1 st before BOR marker, p1.
3. Rnd 5: p1, k25, ssk, k1, k2tog, k52, ssk, k1, k25, p1, SM, p1, k34, ssk, k38, k2tog, k34, p1. 110 sts front/ back.
Rnds 6-8: as rnds 2-4.
Lower body
4. Rnds 1-3: P1, k to 1 st before marker, p1, SM, p1, k to 1 st before BOR marker, p1.
5. Rnd 4: P1, k26, M1L, k1, M1R, k54, M1L, k1, M1R, k26, p1, SM, p1, k35, MIL, k1, M1R, k36, M1L, k1, M1R, k35, p1. 114 sts front/back
Rnds 5-7: as rnds 1-3.
6. Rnd 8: P1, k27, M1L, k1, M1R, k56, M1L, k1, M1R, k27, p1, SM, p1, k36, MIL, k1, M1R, k38, M1L, k1, M1R, k36, p1. 118 sts front/back
Rnds 9-11: as rnds 1-3.
7. Rnd 12: P1, k28, M1L, k1, M1R, k58, M1L, k1, M1R, k28, p1, SM, p1, k37, MIL, k1, M1R, k40, M1L, k1, M1R, k37, p1. 122 sts front/ back
Rnds 13-15: As rnds 1-3.
8. Rnd 16: P1, k29, M1L, k62, M1R, k29, p1, SM, p1, k38, MIL, k44, M1R, k38, p1. 124 sts front/ back
1. This ensures that the shaping ends at the waist.
2. This round decreases 4 stitches at the front, and no stitches at the back, followed by 3 non-shaping rounds.
3. This round decreases 4 stitches at the front, and 2 stitches at the back, followed by 3 non-shaping rounds.
Note, normally I would condense these instructions. Here, I have written it out in full, so that you can follow the numbers through.
4. 3 non-shaping rounds below the waist.
5. This round increases by 4 sts at the front and back, followed by 3 non-shaping rounds.
6. This round increases by 4 sts at the front and back, followed by 3 non-shaping rounds.
7. This round increases by 4 sts at the front and back, followed by 3 non-shaping rounds.
8. This round increases by 2 sts at the front and back.
Wait there’s more!
You may also be interested in these related posts:
- set-in sleeve construction
- modifying sleeve cap (coming soon)