Recently I decided I wanted to knit some socks. I’ve never wanted to knit socks before. But it seemed like a perfect project. So many design decisions – top down or bottom up? Short row heel or something a bit more elaborate? What sort of toe? And, coming after a crochet blanket, it seemed a nice little project. Prepped and ready – with more information about sock knitting than I ever knew existed – I started work on the brioche sock knitting pattern.
I like to wear big woolly socks round the house in winter. At least, I often go round the house in bare feet and then realise that I need to wear big woolly socks in winter. And none of the ones I have bought have ever been quite right after the first perfect pair which are now in holes. So, the thought of making my own definitely appealed. It also seemed the perfect project to try out a spot of brioche knitting. I love the look of this, but it does seem very fiddly, so a small project seemed a good idea.
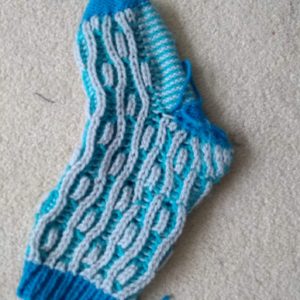
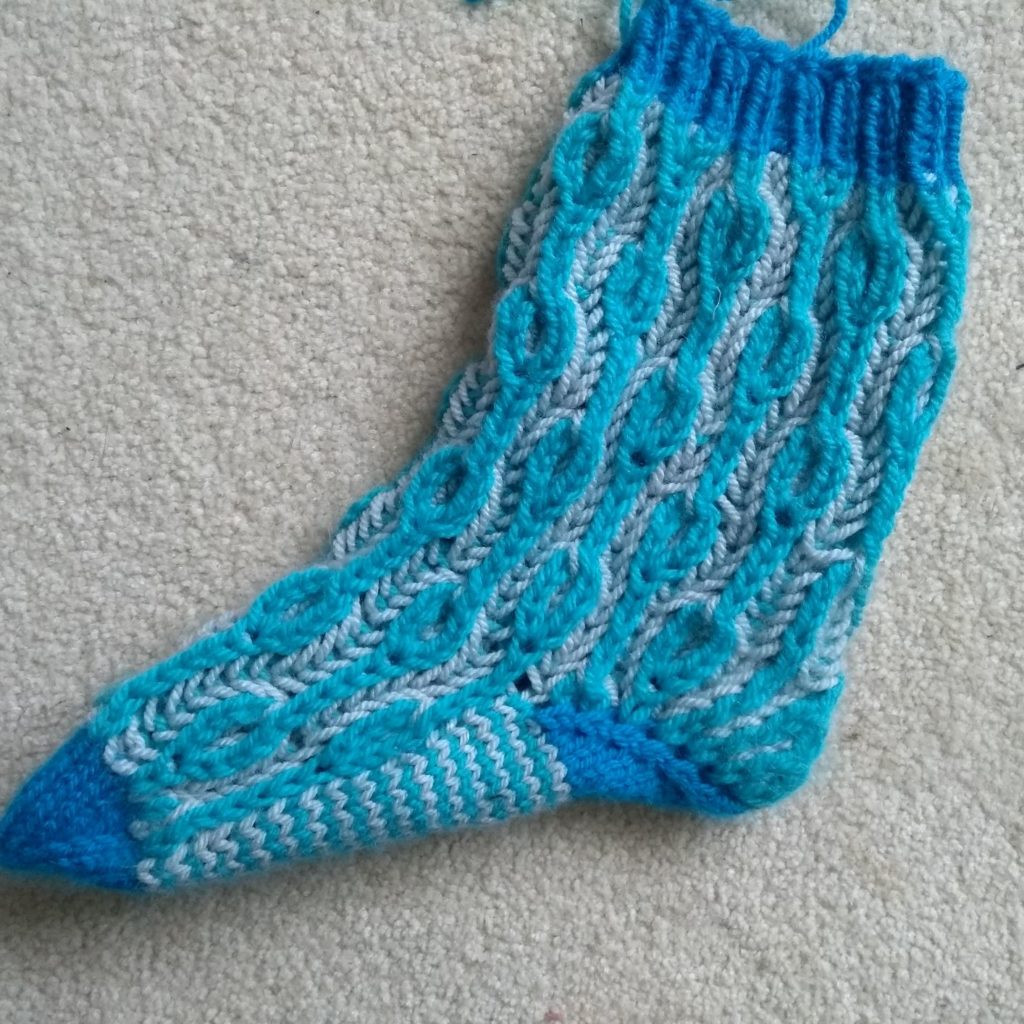
The socks have been finished now for around a month. But I still have not woven in the ends. This is a bad sign. It is likely that they will never be finished. They did not turn out quite how I wanted, and I’m not sure that I want to invest the time to adjust the pattern and re-knit them. Let’s try and evaluate the experience. Hard things first – what do I like about them?
Things that I like:
- I like the colour combination and that it used up some wool from the ever increasing stash
- I like the fact that these are first socks that I have ever knitted, made from a pattern I wrote, and yet they look recognisably like socks.
- Erm….
- I like the fact that I learnt some new techniques – brioche stitch, magic cast on and flexible bind off.
Now the much easier task.
What don’t I like?
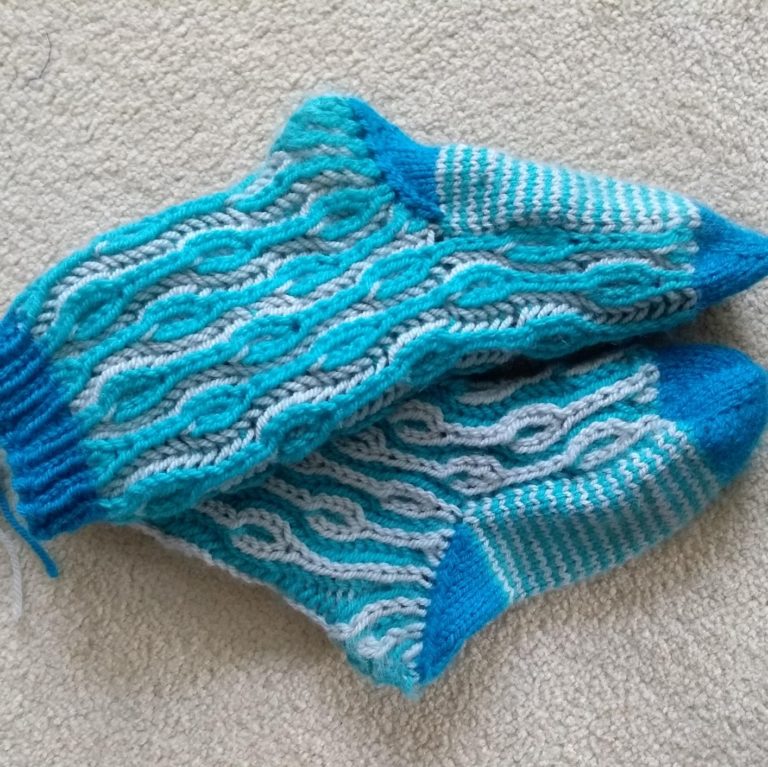
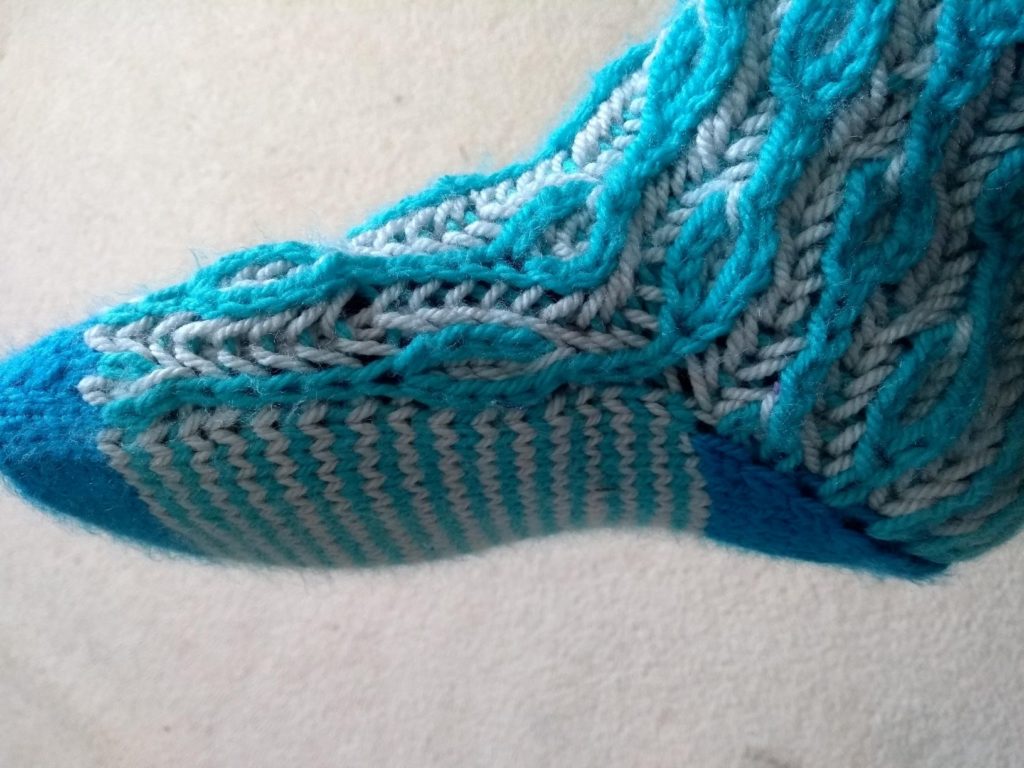
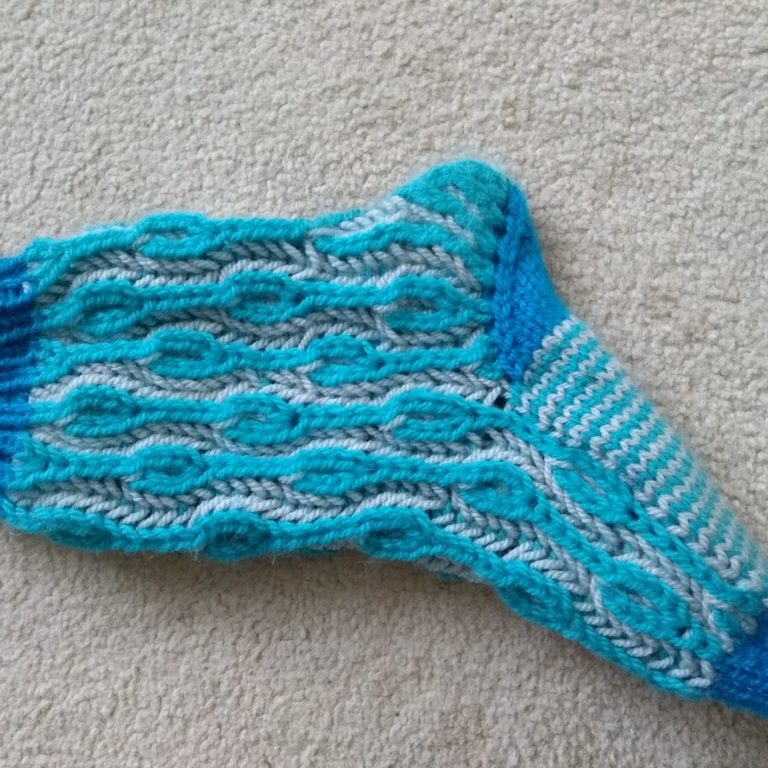
4. The heel. I chose a version of the strong heel so that I could put the decrease in the centre of the heel which (I thought) would create a strong design of sloping lines. This has not worked as well as I hoped visually, and has also created an odd rather pointy shape for the heel. I think it would be better to place the decreases on the seam between the heel and the instep.
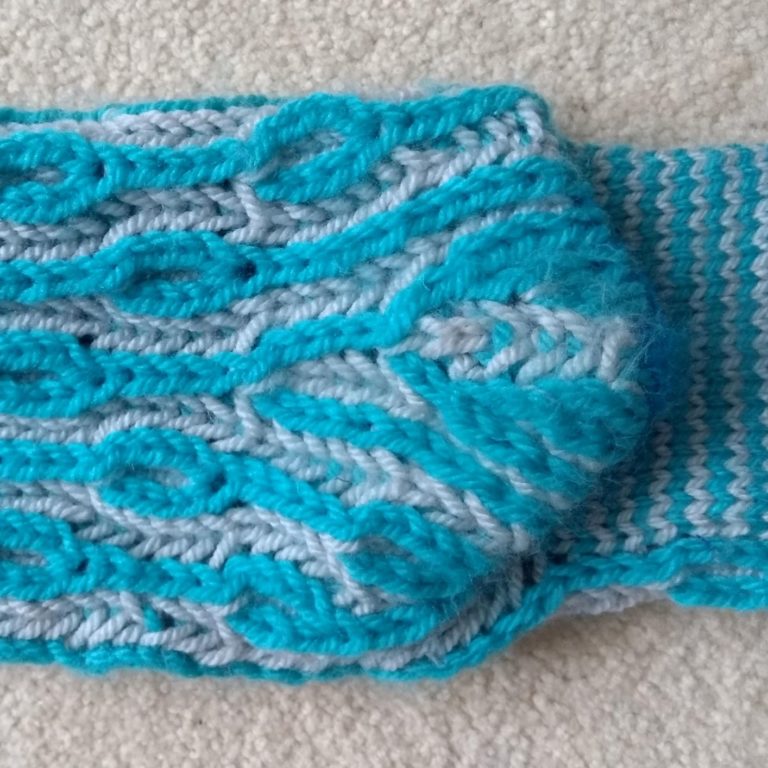
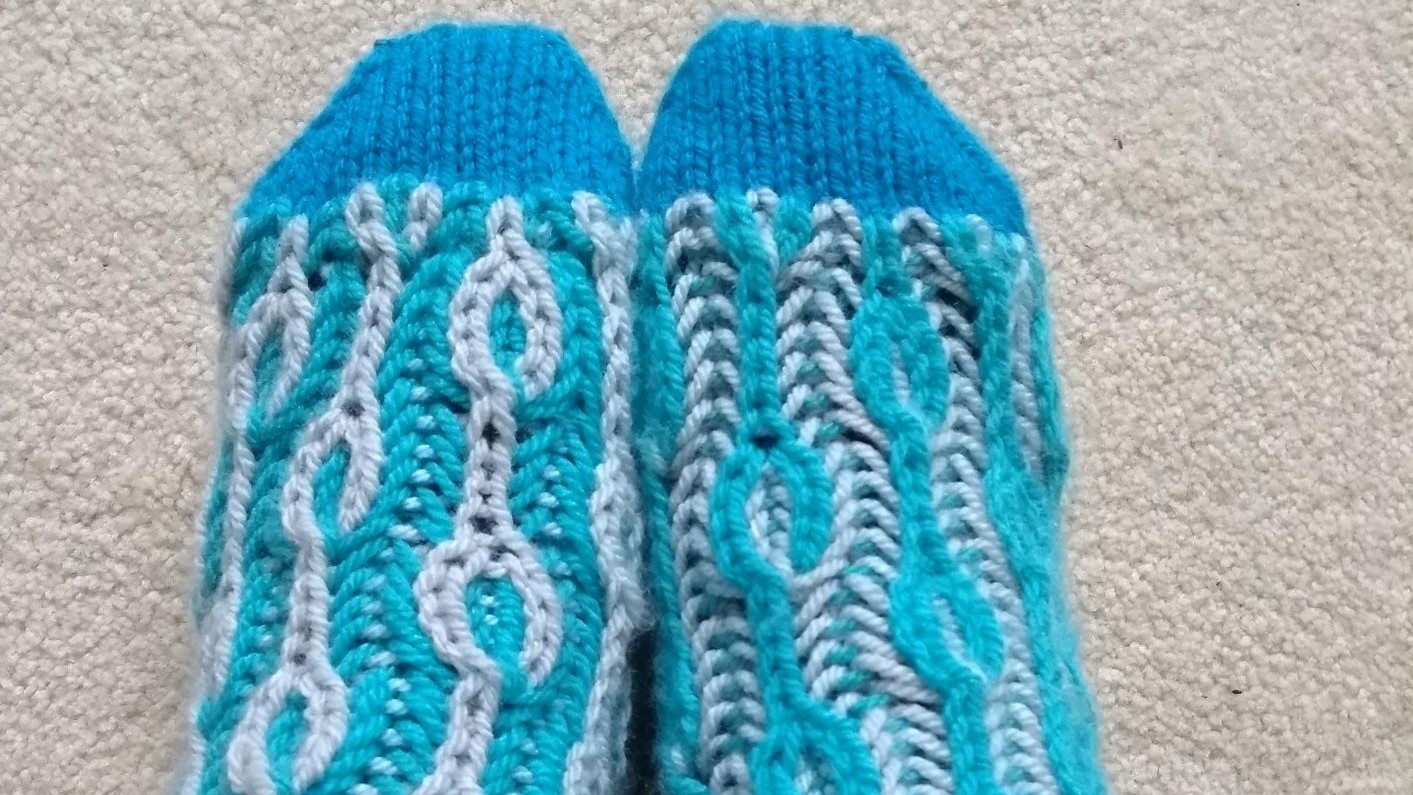
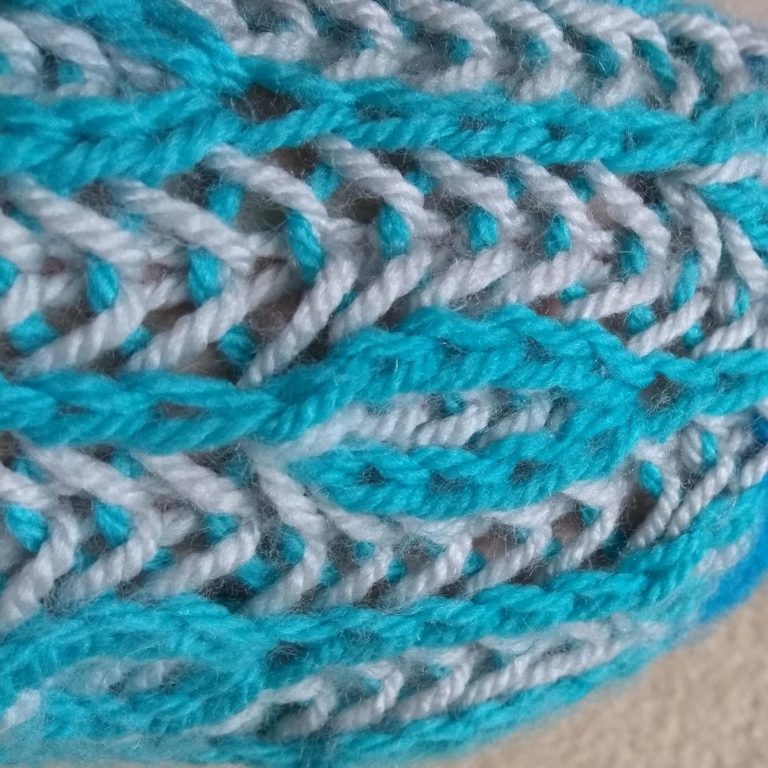
1. The brioche stitch pattern. In my head this was all lovely geometric angles. In practice, it looks like lines with circles along them. In fact, I much prefer the wrong side, as you can see below.
All of this is fixable, but I just don’t like the socks enough to do it. I’ve decided not to release the pattern on Ravelry as I am just not happy with it as it stands. I will make it available here. Perhaps you would like to play around with it for yourself? If you do, I would love to hear about your project and how successful you feel it has been.
At the risk of sounding cliched, it has been a great learning experience. I’m likely to return to sock knitting, but with a much better understanding of what is likely to work, and what I want to achieve. As winter approaches a pair of substantially ribbed welly socks that don’t work their way off my feet is becoming increasingly attractive.
Brioche sock pattern
Size: approx. UK shoe size 6 (US 7). Foot circumference 21 cm (8in), foot length 24 cm (9.5in).
Yarn: Aran, approximately 110g (205m) in total. I used Paintbox Yarns Simply Aran in kingfisher blue, marine blue and stormy grey.
Needles: Worked in the round on cable needles. I used two cable needles for the foot (size 4mm and 5mm) and the magic loop method for the leg. You could also use double pointed needles if you prefer.
Tension: 18 st and 24 rows to 10cm (4in) in st st on 5 needles.
A note on needles and tension: When worked on the same needles one row of brioche (2 passes) will be slightly larger than 1 row of stocking stitch (st st). As the sock is worked in the round the aim is to have one brioche row equal two rows of st st. To achieve this you need to use smaller needles for the st st and larger needles for the brioche. It may be that you need to use needles several sizes apart. There is a trade off between matching the two stitch patterns exactly, and still having an acceptable size for the brioche. If this is worked on needles that are too large then the stitch will become very large and open. There are a number of ways to accommodate this:
- Close enough is good enough. The brioche stitch is very forgiving and stretchy and so if the two stitch patterns don’t match entirely it will probably still be OK. I knit loosely and so used a 4mm needle for the sole and 5mm needle for the brioche. At the end of the foot my sole was approximately 1 cm longer than the instep, but this cannot be seen on the final sock. If you choose this solution, take all measurements from the st st as this is the least stretchy stitch.
- Change the tension and work the st st on a smaller needle in relation to the brioche. The brioche stitch should stretch enough to accommodate the circumference, but you will need to adjust for length. If you do this the heel and toe will be slightly shorter, and you will need to make the foot slightly longer to compensate. To work out the new length follow the calculation:
- Knit the toe to your new tension. Measure the length when completed.
- Double your measurement to find the approximate length of heel and toe together (Your heel will be approximately the same length as your toe)
- Subtract the length of the toe and the heel from the overall length of the sock (given above). The result is the length that you will need to knit between the toe and the start of the heel.
- Amount to knit = total length of foot – (2 x toe length).
Abbreviations
MC main colour (this will form the knit columns), CC contrast colour (this will form the purl columns), AC accent colour for toe, heel and cuff, k knit, p purl, brk brioche knit, brp brioche purl, sl1yo slip yarn over, wyif with yarn in front, brssk brioche slip slip knit (decrease), brk2tog brioche knit 2 together (decrease), brkyobrk brioche knit yarn over brioche knit (increase), p2tog purl two together, ssk slip slip knit, yo yarn over, m1 make 1 st by knitting into horizontal bar between current and next st, st(s) stitches.
Brssk
- On brioche st slip st+yo as if to knit.
- knit single st and next brioche st together
- pass slipped brioche st (2 loops) over
Brk2tog
- on brioche st slip st and yo as if to knit
- knit single st
- on right hand needle pass slipped sts over knitted st
- put knitted st back to left hand needle, and pass second brioche st (st + yo) over
- place knitted st back on right hand needle
Brkyobrk: in brioche st, knit both loops but don’t take st off needle, yo, knit and take st off.
Pattern starts
Toe
Using small needles and contrast yarn, cast on 12 sts using Judy’s magic cast on.
1st row: knit, divide sts between two needles
2nd row:needle 1: k1, m1, knit to last stitch of first half, m1, k1
Needle 2: k1, m1, knit to last stitch of first half, m1, k1
3rd row: knit
Repeat rounds 2 and 3 until there are 36 sts on needles. Break yarn
Foot
Using CC, place 18 sts on smaller cable needles for sole, and 18 sts on larger needle for instep. Work all the sts for the sole with the smaller needles, and all sts for instep with larger needle.
Set up row CC: work across sole in k, wyif *sl1yo, p1 repeat from * to end of round
MC 1st round: work across sole in k, *brk1, sl1yo, repeat from * to end of round.
CC 1st round: work across sole in k, wyif *sl1yo, brp1 repeat from * to end of round
2nd round: as round 1
MC 3rd round: work across sole in k, [brssk, sl1yo, brkyobrk, sl1yo] 3 times
CC 3rd round: work across sole in k, wyif *sl1yo, brp1 repeat from * to end of round
rounds 4-7: as round 1
MC 8th round: work across sole in k, [brkyobrk, sl1yo, brssk, sl1yp] 3 times
CC 8th round: work across sole in k, wyif *sl1yo, brp1 repeat from * to end of round
rounds 9 and 10: as round 1
Rows 1-10 set pattern. Continue in pattern until work measures 11 cm excluding the toe. DO NOT break yarn.
Heel turn
With WS facing, working on 18 sts for sole only and the smaller needle in AC
1st row: s1, p2tog, purl to end turn
2nd row: s1, ssk, knit to end, turn
Repeat rows 1 and 2 until 4 sts remain ending with WS row. Keep sts on needle.
Heel gusset
With RS facing, start at lower right edge of heel turn, and with larger needles:
MC foundation row: pick up 14 sts on decrease edge, knit across 4 sts of heel, pick up 14 sts on decrease edge. Work across instep with larger needle in established pattern. (50 sts across both needles)
Using large needles throughout:
CC set up round: treating all relevant sts as if they have a yo, work in established pattern for 6 sts (now referred to as pattern). (wyif sl1yo, p1) 10 times. Pattern next 6 sts, treating all relevant sts as if they have a yo. Work in pattern across instep sts.
MC 1st round: pattern 6 (brk yo) 3 times, brsk yo br2tog, yo (brsk yo) 3 times, pattern remaining sts
CC 1st round: wyif *sl1yo, brp1 repeat from * to end of round
MC 2nd round: pattern 6 sts, (brk yo) 3 times, (brk yo) twice, (brk yo) 3 times, pattern remaining sts
CC 2nd round: as round 1
Repeat rounds 1 and 2 a further 2 times, decreasing the underlined repeats by 1 each time.
MC next round: pattern 6, brk yo, brssk, yo, brk yo, pattern remaining sts
CC next round: as round 1
Leg
With 36 sts on needle, work in pattern for 14 cm
Break off yarn
Cuff
Using smaller needles and AC:
Next round: *k1, p1 repeat from * to end
Repeat this round 7 times
Cast off with flexible cast off.
Weave in all ends.