Mosaic knitting is a colourwork technique that gives the appearance of multiple colours being worked on a single row. In reality, the knitter only works with one yarn at a time, and achieves the colour changes by slipping stitches. Patterns often use mosaic knitting charts. Mosaic knitting can be worked flat or in the round. The techniques vary slightly depending on which you choose. In this tutorial, I discuss how to convert one type of chart into the other.
Reading mosaic knitting charts
All mosaic knitting is worked by alternating – usually two – colours. These are often shown on charts with white as the main colour (MC) and black as the contrast colour (CC). On a MC round or row, the knitter will be working with MC yarn, on a CC round or row the knitter will be working with CC yarn. The rounds or rows should be clearly marked for which yarn to use. When you are working with MC, all MC coloured stitches are knit and all CC coloured stitches are slipped. When you are working with CC, all CC coloured stitches are knit and all MC coloured stitches are slipped. You should slip all stitches with the needles point to point (in the purl position) but with the yarn held at the back (wrong side) of the work.

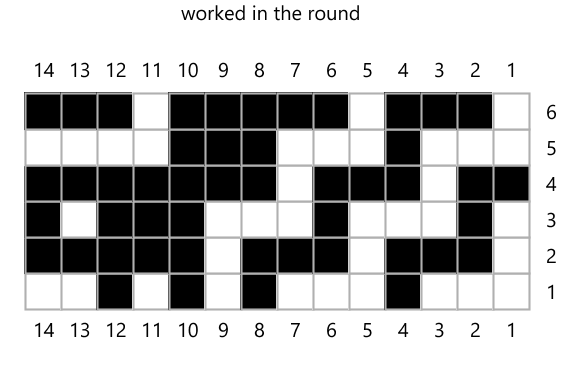
For this particular chart example: all MC coloured stitches are marked in black, all CC coloured stitches are marked in white. This is a mosaic knitting chart for working in the round. By convention round/row numbers are placed at the start of the row. As every number is on the right, every row must start here which means this chart is intended to be worked in the round. Odd rounds are worked in CC, even rounds are worked in MC. So, round 1 would be worked in white (CC) and round 2 in black (MC).
The knitter would work the chart as follows (assuming this is worked in stocking stitch):
- Row 1: (k3, slip 1) twice, (k1, slip 1) twice, k2.
- Row 2: (slip 1, k3) twice, slip 1, k5.
- Row 3: k1, slip 1, k3, slip 1, k3, slip 3, k1, slip 1.
- Row 4: k2, slip 1, kl3, slip 1, k7.
- Row 5: k3, slip 1, k3, slip 3, k4.
- Row 6: slip 1, k3, slip 1, k5, slip 1, k3.
Mosaic knitting worked flat
You may decide that you like the motif in a pattern, but that you would prefer to work flat. You can adapt any mosaic pattern from the round to working flat (or vice versa) using one of two options.
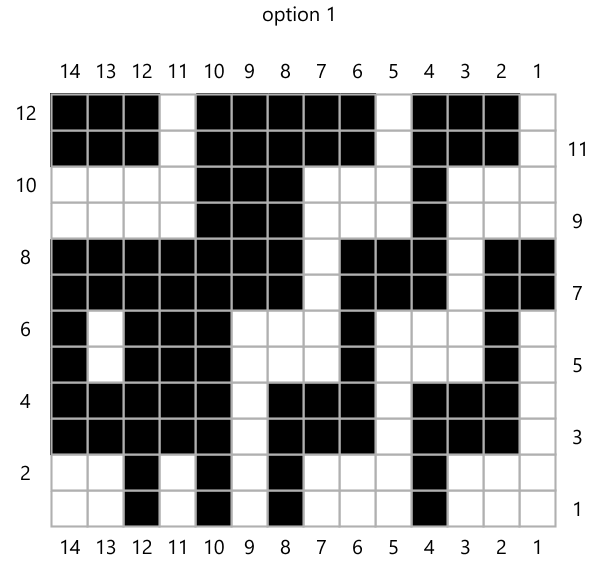
Option 1: Adding wrong side rows
This option is the easiest to knit, but it will change the look of the motif quite substantially. For this technique, you simply add a wrong side row to the mosaic knitting chart. The added row allows the knitter to work in two row stripes. This makes managing the yarn much easier. To indicate a wrong side row, the row number is on the left of the chart. This new row will be an exact replica of the right side row immediately below it.
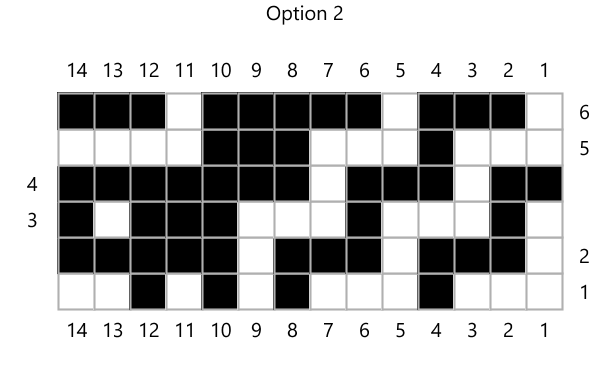
Option 2: one row stripes
This option is somewhat harder to work, but it does preserve the original look of the motif. You will need a circular or double pointed needle. For this option you work only the rows that are in the chart, again working in one row alternating stripes of colour. To work the mosaic knitting chart given on the left, you would start with CC on the right side (row 1) and work across the chart as usual. At the end of the row, you slide the stitches back to the other end of the needle and work another right side row (row 2) this time in MC. When you reach the end of this row, you turn your work.